United Fly Tyers of Rhode Island, Inc.
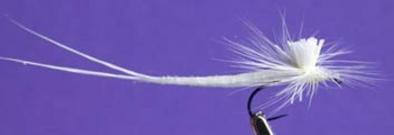
Jax Hex
Created and Tied by John O'Meara
Hook: Almost any dry fly hook will work, but I like the Tiemco 103BL in size 9 or 11. The 103BL is lighter and has a wider gape than most other dry fly hooks of comparable size, assuring better hook ups.
Thread: 6/0, or 8/0 white, or primrose, Danville or Rumph, Note, do not use Uni thread. As much as I like Uni, the flexcement attacks it
Tail: White deer belly hair
Body: Ditto
Legs: Ditto
Parachute post: Ditto
Hackle: White deceiver hackle, or other large white hackle
1. Before tying anything to anything, select six strands of coarse deer hair of approximately the same length. They should be at least two inches long. Hold three of them together by the butt ends. Align the curves so they all swoop in the same direction. Coat all three with Dave’s Flexcement, and stroke them together. Ditto the second three. Set them aside to dry on a piece of waxed paper. These will be the tail of the fly, and will be tied into the extended body shortly.
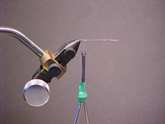
2. Next, place a fine needle into your vise, gripping it near the eye. Be sure that one inch of the pointed end is clear of the vise jaws. Tie onto the needle one inch from the point.
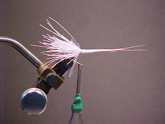
3. Cut a one inch length of drinking straw. Cut a small bunch of coarse deer hair, and remove the refuse from the butt ends. Use your stacker to even up the tips. Place these hairs into the short straw with the tips down. Place your index finger over the end of the straw at the tip ends.
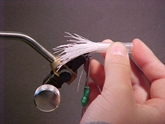
4. Place the entire assembly, hair and straw, on the needle and move it up to the thread hanging there waiting for you. Your finger tip will keep all the deer hair from being pushed out of the straw. Now you can let go of the straw, and gently grasp the butt ends. With just gentle pressure on the thread, (remember, you must slip this body off the needle later), wind the bobbin toward the needle point to simulate segments of the body. The thread will work the straw backwards toward the end of the body.
5. When you reach the point of the needle, and the straw falls off, place the two tail pieces on top of the body at this point. The tail pieces should extend another inch beyond the body. Orient the curvatures of the two pieces, and as you hold them in place wind over them as you wind toward the starting point.
6. When you reach the starting point, tie off at this point. You can cut off the excess thread after you tie off, but do not cut off any excess deer hair. This will form the post and legs of the fly.
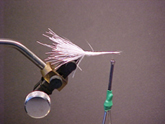
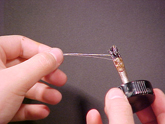
7. Slip the body off the needle, and coat it with thinned flexcement. Set it aside to dry for a few minutes. When dry, you can lash it to your hook. Leave room for the head in front of the extended body. Notice, at this point, you can tie the fly backwards on the hook if you like to fish downstream. Frankly, I had just as good luck with the fly floating downstream backwards. Your choice. See photo 7
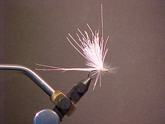
8. Fom the clump of extra deer hair, pull 6 or 8 short ones down to act as legs. Pull the remaining longer ones upward to form the post for the parachute. Make several gentle wraps of threat upward, and the downward to form the post. At the bottom of the post, tie in the hackle with the concave side facing the fly. Wind the hackle for at least three turns, each one under the previous one. Tie off and cut your thread. Cement the head.
9. Cut the excess post material. Coat the post with Dave’s Flexcement. Be careful not to get any cement on the hackle. Voila!!!
Just a reminder, this is a large mayfly. The usual rules for sizing the hackle do not apply here. You want a good size hackle to keep everything in proportion.